[membership_breadcrumbs style=”2″]
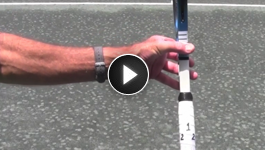
[text_block style=”style_1.png” align=”left” left_padding=”95″]The Grip
Key Points To Keep In Mind
Ready Position And Contact Zone[/text_block]
Key Points To Keep In Mind
Ready Position And Contact Zone[/text_block]
[text_block style=”style_1.png” align=”left” left_padding=”95″]Common Problem Hitting In The Net
Common Problem Hitting Long[/text_block]
Common Problem Hitting Long[/text_block]
[text_block style=”style_1.png” align=”center” font_size=”20″ font_font=”PT Sans Narrow” font_style=”300″ font_color=”#555555″]The Grip[/text_block]

[text_block style=”style_1.png” align=”center” font_size=”20″ font_font=”PT Sans Narrow” font_style=”300″ font_color=”#555555″]Key Points To Keep In Mind[/text_block]

[text_block style=”style_1.png” align=”center” font_size=”20″ font_font=”PT Sans Narrow” font_style=”300″ font_color=”#555555″]Ready Position And Contact Zone[/text_block]

[text_block style=”style_1.png” align=”center” font_size=”20″ font_font=”PT Sans Narrow” font_style=”300″ font_color=”#555555″]Common Problem Hitting In The Net[/text_block]

[text_block style=”style_1.png” align=”center” font_size=”20″ font_font=”PT Sans Narrow” font_style=”300″ font_color=”#555555″]Common Problem Hitting Long[/text_block]